Category Archives: Cornstar

Posts relating to the online HTML game: Cornstar.

Cornstar Week 9: More programming and MVCs

This week I figured that my plans were a bit off as I realized that I’ve been mostly doing framework programming in the last 2 weeks and unable to actually do much of the front-end. So this entry will be mostly about my research with the “model / view / controller” frameworking and a little bit of front-end work.

Researching good MVC practices

As the title says, I’ve spent some of the week looking at how “Model / view / controller” frameworks can work in php. The first one I found was a framework called “cakePHP” [CakePHP about page]. This one seems fairly huge and comes with a lot of little helper functions like being able to create forms and form fields that just work automatically with the controller files [CakePHP form helper]. After downloading it and trying it out (also free!), I see they use almost the same structure that I’d planned with Cornstar with the controller and view folders, and setting constants in the main index.php file, except that it uses a templating system that outputs the “content for layout” in the template. The content is filled in with the views. This is different because I wanted to use a header file and footer file for creating templates. I could potentially try this method but I’m not sure how it’d even work. The other MVC one I found was a really simple one “PHP-MVC” by a user called “panique”. [php-mvc]. This one is really simple and because of this, makes it a lot easier to figure out how MVC really works. CakePHP is good, but it’s huge and complicated with a lot of security built in, plus it has a “bake” functionaliy that lets you create entire websites via the console [Cake Bake], which seems pretty useful, but adds a whole extra chunk of code that I probably wouldn’t use for Cornstar. Another thing I notice is that because of the flexibility of cakephp, there’s a lot of other bulk in there that probably isn’t needed, like the ability to join tables with a single function or email template systems. Looking through the codebase of just these 2 systems, I could easily create my own MVC system that works best for only Cornstar.

Database

Today I built the database and found that my original plan mostly worked well apart from a couple of things like the friend system, farm sizes and the users table being now called a “farms” table. The first thing I did was created the users table. I ended up re-naming this to “farms” as it makes more sense as each user will only have 1 farm. In this table, I also split off the width and height of the farm into a separate table. This is because I wanted it harder to hack in ambiguous widths and heights and also it’d be easier to link a single set of farm dimensions to the shop system with just IDs. Another idea I had that could be implemented in future versions is that the expansions will be limited by the experience of the user. A user will only be able to upgrade when they are a certain level, and it will also cost game money. This means the farm table will need XP (experience) and level to buy. But doing this to the game would require user level system using XP and saving their level in the database. This would be too much work for a small feature. For the plants I made the “seeds” table a “plants_type” table and made the ID in the seeds table reference this with “plant_type_id”. A little extra thought was being able to use little icons for each of your neighbors. To do this, I’d need some way of either uploading images or linking ones already on the net. Ones that already exist could be a user simply choosing from a selection of icons, or maybe a random image generator using the username as a seed. As uploading may require extra security and cropping, I decided to allow users to simply add a link to their thumbnail. A proper website would need to allow uploads and cropping, but that seemed a lot of work for a small website and would only be something to consider in the future.

HTML5 template

To start programming, I could just start from scratch and write the same code that every website has, or I could just get a template of the usual HTML and css websites usually have. I find that writing CSS can be tedious because it is usually abused to get the website to work well with search engines and to have proper standards, like using list items as a menu or floating divs to the left or right in the layout. I looked around for some templates to get me off the ground running and there were a few. [HTML5 Blank Source Code Template] [html5reset.org] [Blank HTML5 template]. But there http://www.initializr.com/


Cornstar Week 8: Let’s begin programming

This week I worked on the website’s template, setting up the website environment, and adding a source control using GIT and BitBucket.

Note that I refer to “cornstar.com” please don’t visit that URL. I’m using this as an example, this won’t be the actual URL. Thanks, and sorry (if you do).

File configuration and web server settings

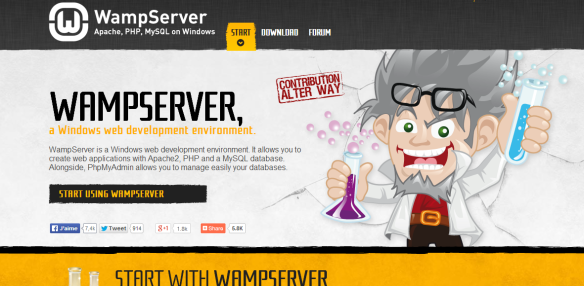
First of all: software. This game will be a website-based game. So it should be run in a  browser. As an extension to that, not only will I be handing int eh doe for it, but also presenting it on s server for everyone to play. This will allow me to test security and show it off to my friends. So what software do I use? Well, for doing work on my local machine we have software like XAMPP [www.apachefriends.org/index.html] and WampServer [www.wampserver.com/en/], which are bundles of programs that web servers need (with all settings set for running on your machine, live web server or a local one). Both of these use a web server program called “Apache” [www.apache.org/]. Apache basically runs the server, of example, when someone requests a file, it serves it to the user, and a few other things. Apache is free, which is a plus for students like me. There is also PHP bundles in xampp and wamp, PHP is also a free scripting language for web pages. Like some other languages, it can be embedded into HTML files, and when these files are requested over the net, Apache runs the PHP executable on the web server and compiles it on the fly, producing the compiled page to the user. Wamp and xampp also both come with MySQL, which is another free program. This one is basically a database program that can be sent requests like “select * from users where user.id = 3”, and it will give you all the columns in the table “users” when the row of the user’s ID is 3. MySQL manages all the data it’s self, and you just need to give it simple requests to store, modify, and receive it. Okay so enough of the obvious stuff, do I choose wamp or xampp? Both are good and which one you need is basically personal oppinion, as they do almost the same thing. I’ve chosen WampServer as I’ve used it for 5 years and I’ve had little to no issues with it (unless I try and do something completely insane). Also look at the home page: 20140419214637 How can you not think that’s awesome? So, after installing wamp, I was able to create a vhost (mentioned in a previous post) and link it to the root directory of the site. 20140419215115 The reason the path is in “root” is also explained in a previous post, but it’s basically because of security. Nobody accessing the “front-end” of the server can get to anything in the directory before there, which includes logs and database login details. I then added a custom URL to my Windows’ “host” file:

127.0.0.1 cornstar.localhost
127.0.0.1 www.cornstar.localhost

This allows me to access the site via these URLs. Once the vhost and hosts file is updated you can run wamp. The next thing was getting the website templates ready. This was difficult as I had to figure out a good way to do the Model/View/Controller method so that it doesn’t come back to biter me later. First of all, I renamed the folder from “assignment1” to “cornstar” because I’m now hooked on that name. For the MVC structure, the idea I had was to create folders for each of these, plus a config folder, and a “root” folder where the site root is loaded for example: cornstar.com/ is where the program will be run from. This means I will need an index file in that root path. The choices I had for this was an index.html or an index.php. I chose index.php as the file will most likely be a stub that loads the rest of the application (like a kind of boot sequence I guess) and so will just have a php script in it. As well as the index file, there will be other folders for the program/website’s content like images, javascript and css files. These will be in the folders named “img”, “js”, and “css”. I chose these names because I am a firm believer in short URLs. Short URLs are easier to remember and look nicer in my opinion. For example, I might want to visit the about page on a website, and instead of going to something like “www.mysite.com/index.php?page_id=123&session=f39jfase0w3er0qwesjcd&message=what%20;am%20;you%20;” it would be nicer to visit “www.mysite.com/about”. However, the way this website will be done, you will notice that this will not be the case if I have to load this application from an index.php file. This is not always the case, as the index.php file is a default file (along with files like default.html or index.html [Apache settings]) so loading www.cornstar.com/ will load this index file. The other note is that it can also apply GET parameters to this. For example, “www.cornstar.com/?user_id=234”. However (again) this goes against my “nice URL” philosophy. So how do we get a nice URL like www.cornstar.com/user/234″? There’s 2 methods; 1: place folders with index files in each of them. For instance, a folder in the root with the file-name of “user” and then maybe a folder for each user (which can be created with scripts [php mkdir]). OR 2: use an Apache module called “mod_rewrite” [Mod reqrite apache doc].

Mod rewrite is voodoo

Mod Rewrite is “the Swiss Army Knife of URL manipulation” [Apache mod-rewrite]. As you can guess, using this plugin, I can fully manipulate the URLs of the web server, forcing it to load what I like. “ Despite the tons of examples and docs, mod_rewrite is voodoo. Damned cool voodoo, but still voodoo. ” — Brian Moore – bem@news.cmc.net I will use this to force the web server to interpret “cornstar.com/users/234” as “cornstar.com/index.php?controller=users&foreign_key=234” for example. Visiting this URL will load a user’s farm. In the “model” folder, there will be configuration files for each of the database tables. For example there will be a file called “users.php” in the models folder that will have settings for the users. The controllers folder will contain all the functionality of each page, for example there will be a file called “users_controller.php” that inherits the “app_controller.php” which controls all the views. The view will be a php file that includes the header at the top, contains all the page’s html, and then the footer file will be included the bottom of the file. This method is used in content management frameworks like WordPress [template layout]. The index.php will be the entry point, and all other files wil be loaded in according to the page that’s being loaded. The following diagram shows the basic idea around this, although it may change as the project evolves: Cornstar flow - New Page (1) [Click for larger view]

Creating core app files

The first thing I did was create a database.php file. This will hold an array of the current database’s login details and host. What I also wanted to do was, if the site is online, or local, the application figures it out and sets the correct database details:

20140420045043

The “Config” variable will be one that I will use throughout the application. Although it seems using a global variable is bad practice, I did think of using a singleton class for the database config, but it is recommended by many “up-voters” that singletons in PHP aren’t recommended [Stack overflow].

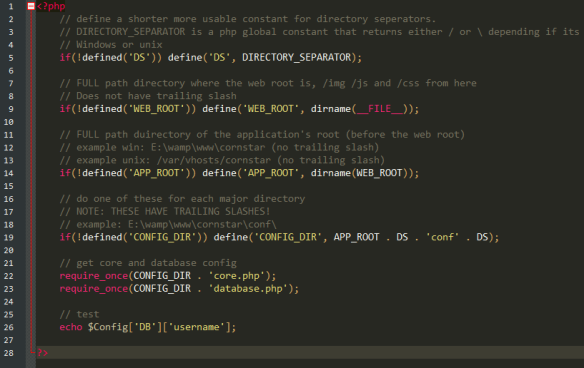
Next, I began creating the main juicy index.php file. Here, I start building a library of constants to refer to within the program so each file knows where other files are easier and it acts as an entry point to the rest of the application:

20140420045055

It looks confusing, but if you have a look at each line, it makes sense. Each of the defines is checking to make sure it’s not defined already, just in case.

At the time being, the “core.php” file is empty, but will contain some site options for easier configuration when the time comes.

The result of the above chunks of code is the following:

20140420051611

It seems like a lot of code to do such a simple things, but this framework I’m building is key to creating a usable application in the long run. As you can see, I can access any of the database values just with that array. So, towards the middle – end of the project, programming will become a lot easier.

Source control

I’ve used Bitbucket [Bitbucket home page] for source control as I enjoy GIT over other source controls (another one of those personal opinion things) mainly because I’ve tried perforce, SVN and git, and I just like the feel of git, mainly because of Bitbucket’s interface (and Bitbucklet supports git). Bit is a free version control system, and Bitbucket is also free (for limited use). 2 good reasons (the same reason) to use these.

For my Windows use with git, I’ll be using TortoiseGit and Git bash. I need git bash for console commands as sometimes it’s easier to use the console to do git related commands, and TortoiseGit is a GUI for git that lets you use compare tools and context-sensitive settings and tools. (I can right-click on the cornstar folder and push changes from there).

Here’s a picture of the files committed to bitbucket:

20140420061722

I’ll post another entry for the rest of this as it’s pretty long. See you next time.

Cornstar Week 7: Work Plan

This will be an entry to try and get some goals set in place for this project.

Seeing as I’ll be away for 3 weeks of the project, I’m really going to need to create a plan of thing that I need to do and when.

Some dates

  • Project start: 17th Feb (week 1)
  • Drafts and plan in by: 31st March (last post). (Week 7)
  • Project Due: 15th June (week 17)

Week listing

  • Week 1 – 7 : Getting draft design done and database plan.
  • Week 8 – 7th April – start creating the basic files that run the game. Do the front-end rendering of the game interface. Add some controls for adding seeds (just the buttons, dropdown etc, friend buttons). Add files to bit-bucket using version control.
  • Week 9 – 14th April – Create login and join screens and make users get added to database, plus read from database. create a session for logged in users and use a cookie to track their login session.
  • Week 10 – 21st April – Work more on user system and ensure security
  • Week 11 – 28th April – Add in functionality for logged-in users to add seeds using jquery. Adding seeds that take out  money and all the functionality of planting seeds.
  • Week 12 – 5th May – add functionality for seeds to grow and draw the correct image for each type of seeds plus the stage it is at based on what data the seed gets from the database. Additional tweaks etc.
  • Week 13 – 12th May – Add leveling-up system plus the ability to buy more land – land extends play area from left to right
  • Week 14 – 19th May – add friend system and allow users to view friend’s boards
  • Week 15 – 26th May – extra work buffer – tweaking etc.
  • Week 16 – 2nd June – extra work buffer – tweaking etc.
  • Week 17 – 9th June – Final tweaks to pretty much finished draft and any final additions. Final documentation. Update final online version and hand in.


Cornstar Week 1 – 6: Proposal

WAMP and vhosts

To be able to get the server running on my local machine at home, I’ve downloaded and installed WAMP. This was fairly simple with the default settings and it works fine. It just cannot be run after Skype as they use the same port. The way around this is to simply start WAMP first, and then run Skype.

The vhost can be configured by opening up the httpd-vhosts.conf file in the Apache’s conf/extra directory. In here you can add virtual hosts to simulate a real web server domain for each project you work on. The file in mine looks like the following:

# Assignment 1 - Cornstar
<VirtualHost *:80>
    ServerAdmin jamesheazlewood@gmail.com
    DocumentRoot "e:/wamp/www/assignment1/root"
    ServerName cornstar.localhost
    ErrorLog "e:/wamp/www/cornstar/logs/cornstar-error.log"
    CustomLog "e:/wamp/www/cornstar/logs/cornstar-access.log" common
</VirtualHost>

Notice that the DocumentRoot points to the root directory. This is a security measure as all the sensitive scripts and settings will be stored in a directory behind this one. So if someone happens to find a way to access the root directory, they will find it more difficult to get to the sensitive areas.

Setting the website up this way allows me to access and edit the website on a root URL  “cornstar.localhost” by typing that into my browser.

Folder structure

The way I intend on setting up the server will be great for security, organisation, and the MVC software pattern. This structure may be added to as I develop the site, but this is a great start.

  • www – wamp root dir
    • assignment1 – this is a sub dir where the vhosts refers to. This allows me to have multiple websites without moving files around.
      • docs – This is where resources and assignment documents will go
      • logs – this is where Apache and the website store log files
      • root – root of the domain. Typing / after the website domain will be this directory.
        • Index.php – the website runs from this file
        • css – CSS files go in here
        • js – Javascript files go in here
        • img – Images go in here
      • view – all view related files will be stored here
        • template – template files (header and footer) will be stored here. They will contain the main mark-up of the web page to avoid repetition in every page
        • pages – this is where each section of the web page is stored
      • model – all database models go in here
      • controller – all controller scripts go in here
      • conf – all configuration files like database login info and website settings goes in here

Database design

One of the very early things I like to do is create the database and play with that as it is essentially the hard drive of the game. All data about the game, users and corn information will be stored here.

The tables for the database are:

users

Name Type Notes
id int ID of the user
username Varchar 32
password Varchar 64 Encrypted as sha1 before saving
email Varchar 128 Email (checked as proper email before save)
name Varchar 128 Real name, first and last (not required)
<>country Varchar 128 Just country text
money int How much money in the bank. Will always be whole numbers.
width int Farm width
Height int Height
created datetime Date and time user was created
last_login datetime Record of the last time this user logged in

plants

Name Type Notes
id int
seed_id int Links to the seed types
user_id Int Links to which user plated this seed
planted datetime Date and time the seed was planted
harvested datetime Date and time this plant was harvested. *

* Also used to determine if this has been harvested or not. If not, this will be set to “0000-00-00 00:00:00”.

seeds

Name Type Notes
Id Int ID of this seed, used to link from other tables
name Varchar 64 Name of the seed, exmaple “Juicy Corn”
cost int Cost for planting this seed
time int Time in minutes that this takes to grow. 40 hours would be 144,000.
sell int Price this item sells for.

Database notes

The reason I’ve chosen to represent the time left on a plant growing with a date planted is because this is safer to use against hackers trying to dynamically make a plant fully grown. If they do this and send to the system that they are harvesting this plant, the system can check when the plant was actually planted, and if the time has been enough, then it can be harvested, and if not, then we decline the request.

Another table for this database could be a “Country” table. This will allow people to select their country in a drop-down and would store the country as either an ID or a country code (example: AU). However, this is not an important feature of the website, and the country field will not be required, so I’ve left it a as simple text field.

I could have also made the first and last name separate fields in the user’s table, except this sort of this is not important for such a game. If this was a database for a mailing list and you wanted to arrange the users by last name, then that’d be useful. But otherwise there is no point.

Artwork

When making games, I usually start off with assets after planning as usually someone else will do these and I can then focus fully on the programming-side of the game.
Because HTML can include buttons and other tools like select box drop-downs, I will basically only need the game board. The only artwork I’ll need for this would be 3 different animations of corn growing and dirt.

corn0001

DELICIOUS.

Cornstar – A corn growing game


Update:

The game is finished. Play Cornstar. 

title

Hello. I’m Jimmy, a famous corn star. I grow corn and sell it to make money so I can buy more seeds to grow corn. My life is like watching grass grow. Except it’s corn.

 Proposition

For this task, I plan on creating a very simple HTML game that allows users to plant seeds and grow corn. There will be 3 types: baby corn, juicy corn, and golden corn. The baby corn is cheap to buy and cheap to sell, but takes a lot less time to grow (3 hours). The golden corn is slightly more expensive, sells for a lot more but takes 40 hours to grow. More patient users will use this option. The juicy corn sits in the middle of these. In addition to this, once the user can afford it, they can expand their farm.

The idea is that people farm the corn to earn money, and are rewarded for patience, better corn takes longer. Expanding their farm gives them more space to grow more corn, and the cycle continues. Users can then look at their friend’s farms and compare them and their current riches.

The database will need to store user data, crop data, and a link table between the crops, which user, and where the crop is planted. The user data will also contain the user’s currency and stats including the number of each type of corn sold.

For advanced features I’ll be setting up a vhost on my local machine. This is an Apache “virtual host” that lets me have multiple root domains on my local machine without having to change settings or move folders. In addition to this, I will put the game up on a real server with a database to show it off to friends.

Another feature, if I get more time, is to add more varieties of corn. For example red corn, popcorn corn and blue corn. These could be unlocked over time. Another feature could be a bad guy crow that eats your corn unless you get a scarecrow. The scarecrows could be upgraded to be scarier for larger farms.

The game will use javascript for the clicking of corn, but the page will need to be refreshed to see progress of corn growth. However, because the corn will be stored as “time planted”, this can be utilized to show at real-time how long until a corn is fully grown.
Although it would be an interesting feature to have plants die if they are unattended, I want the game to allow users to come back at any time in the future and have their fully grown plants ready to harvest as having them die would annoy some users.

Detailed Plan

Login

Behind the scenes, the first part of the system will be the login screen. Without being logged in, the user will be able to view their farm but won’t be able to plant anything. The user must use a login button at the top of his or her screen to login and make edits.
The actual login screen will be a home-page type of screen displaying a logo and fields to enter their username and password. Once this is done, it will redirect to the user’s farm page.

Farm view

In the farm view, when logged in, there will be displayed the current user logged in, the money they have, and a drop-down (select box) for which seed they would like planted, defaulted to normal corn.

Below this is the game board which will look like a typical chess board, but each corn image will be drawn from top to bottom and can grow higher than the square by 3 times.

20140327035728


By default, and no upgrades, the user will have a 6 X 2 large farm and must grow corn in this area to afford to upgrade to a larger one, 8 x 3. The next upgrade will be 10 x 4, then 12 x 6, then every upgrade after that adds 4 to the Y axis, for example 12 x 10, 12 x 14 etc. This is because web pages typically are scrolled down rather than across.

When editing, the user selects the square at the base of the corn. Clicking an empty space of ground will plant the selected seed. Clicking on fully grown corn will harvest it and give the player money. If the user doesn’t have enough money for a seed, they cannot plant any corn. The user will be able to see their friend’s farms, but need to be logged in to make edits of their own.

When viewing a user’s farm while not logged in, there will be a big bright button telling users to create their own corn farm.